HTML Forms
In HTML, forms are important as they
provide the only means by which a user can input data and send it back to the
web server. The method via which this is accomplished is the <form> tag. You can use the <form> tag to specify the page you wish the data to be sent to, along with
the method by which you wish to transmit the form data. Now all this changes
quite dramatically in ASP.NET, but to understand it more clearly, we need to be
certain of how the <form> tag
works in HTML.
The <form> Tag
The <form> tag is a container tag. It is used purely to denote the set of form controls
that the developer intends to use to convey information back to the server. It
still needs another technology on the server side (such as ASP.NET) to be able
to manipulate the form data and send it back to the user. It also adds no extra
presentational features itself (the form itself is invisible).
In Netscape browsers, prior to version 6,
form controls cannot be displayed without the <form> tag. In other words, all form controls, such as textboxes and radio
buttons, must be placed within <form> tags, otherwise they won't be displayed at all in Netscape. On the
other hand, IE and Opera can still display the form controls without the <form> tag, but if you want to send the form data back to the server, then
the form controls have to be contained within a set of <form> tags. We'll take a look at the <form> tag in more detail now.
While the <form> tag supports eleven attributes (as defined by
the HTML 4.01 standard), there are only two that are essential:
q
action –
specifies the web page we want to receive our form data
q
method – specifies the HTTP method by which our form data is transmitted
The
other attributes, which include name
(with which we can reference the form from client-side code) and target (to specify a different window or frame in which to load the
returned page), are all useful in themselves. However, they're not immediately
relevant to the current discussion, so we will not be looking at them here. For
more information, you may want to take a look at HTML 4.01 Programmer's Reference from Wrox Press (ISBN 1-861005-33-4).
The action Attribute
The first of the <form> tag's attributes, action,
defines the name of the web page that will receive the form data. A typical action attribute in an HTML form might look like this:
<form
action="/aspnet/nextpage.html"Â ...
>
...
We've
referenced an ASPX page here, as HTML forms have to work in conjunction with
another technology. This is still an HTML form though. ASP.NET forms have a
specialized set of attributes that are not part of the HTML 4.01 standard and
we look at some of them later in the chapter.
When you submit a form (send it to the web
server), you need to specify the name of the web page that the information will
be returned to. It could possibly be the same page as the one that received the
information, but for our early examples, we will be using a separate second
page.
One last thing we need to say about this
attribute: make sure it points to a valid page, otherwise you will generate a
page error!
The method Attribute
The second attribute defines the method
of transmission of the form data. There are plenty of different possible
methods of transmission, but in practice, you'll only ever use two of them: GET or POST.
The GET Method
The GET method is the default, and is normally used to retrieve files from a web server. When it is
used in conjunction with a <form> tag though, it sends the
form data to the web server. Form data sent to the server is appended to the
end of the URL in the form of name-value pairs, attached with a question mark. For example:
The first part of this name-value pair is
the name, which acts as an identifier. The second part is the value that you
wish to store. The name and value are taken automatically from a form element
like a textbox or a checkbox. The name of the form element is the name used in
the GET method, and the content the user
has written in the form element is the value. Here 'firstname' is the name, while 'Vervain' is the value. This can be appended to the URL as follows:
http://www.nosuchserver.com/asppages/form.aspx?firstname=Vervain
The browser automatically appends the
information to the URL when it sends the page request to the web server. You
can add more than one name-value pair to a URL if you separate each pair with
an ampersand (&). With two
name-value pairs, the end of the URL might look like this:
?firstname=Vervain&surname=Delaware
As part of the URL it would look like this:
http://www.thereisnosuchserver.com/asppages/form.aspx?firstname=
Vervain&surname=Delaware
The part appended to the URL is known as a query
string. So this is how you can still pass
information between the browser and server, while leaving the HTTP body empty –
it is transferred in the URL.
However, GET isn't the only method that can be used to transmit data, and
indeed, when we move to ASP.NET, we'll see that GET becomes all but obsolete.
The POST Method
One disadvantage you might have discerned from using query strings is the rather public nature of
their transmission. If you don't want the information sent to appear in the
URL, then you will have to rely on the POST method instead. This works almost identically to the GET method, the only difference being that the form information is sent
in the body of the HTTP Request rather than as
part of the URL. This isn't any more secure though: it's just less immediately
visible.
POST can also allow a greater amount of
information to be transmitted. Some web servers have a limit on the amount of
text you can transmit as part of a URL. Using the POST method avoids this problem. Apart from
this, for all intents and purposes, the two methods provide the same
functionality and level of performance. However in ASP.NET there is no choice
of method of transmission, all forms will be sent to the server using the POST method. Before we look at how to return information from a form control
with ASP.NET, let's do a quick tour and refresher through the many form
controls that HTML offers.
HTML Form Controls
For the majority of HTML form controls, you will use the <input> tag to place them on the web page, and for those that have their
own specialist tags, the attributes they require are broadly similar.
The HTML form controls you might use on a typical web page are:
|
HTML Form Control
|
Appearance
|
Description
|
Implementation
|
|
Textboxes
|

|
Textboxes are single line fields for
typing text into
|
Uses the <input> tag, with the type
attribute set to text
|
|
Text areas
|
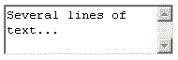
|
Text areas are multiple line boxes for typing text
into
|
Uses the <textarea> tag
|
|
Radio Buttons
|

|
Radio buttons are multiple choice buttons that allow only one exclusive
answer
|
Uses the <input> tag, with type
set to radio
|
|
Checkboxes
|

|
Checkboxes
are single and multiple choice buttons that allow several, independent
answers
|
Uses the <input> tag, with type
set to checkbox
|
|
Listboxes
|

|
Listboxes
are buttons that reveal a drop-down menu, from which you're allowed to select
one or more options
|
Uses the <select> tag
|
|
Submit buttons
|

|
Submit buttons submit HTML forms to the web server
|
Uses the <input> tag, with type
set to submit
|
|
Reset buttons
|

|
Reset buttons reset the contents of an HTML form that hasn't already
been submitted
|
Uses the <input> tag, with type
set to reset
|
|
HTML Form Control
|
Appearance
|
Description
|
Implementation
|
|
Normal buttons
|
|
Normal buttons trigger whatever event they are
connected to
|
Uses the <input> tag, with type
set to button
|
|
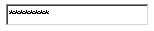
Password fields
|
|
Password fields are like textboxes, but with one important difference: anything you type into
them is disguised by an asterisk
|
Uses the <input> tag, with type
set to password
|
|
Hidden fields
|
No visual appearance
|
Hidden fields are set in the HTML, and are sent
along with other form data
|
Uses the <input> tag, with type
set to hidden
|
|
|
|
|
|
As you can see, the <input> tag deals with the broad majority of HTML form controls, so we'll
take a closer look at it.
The <input> tag has only four attributes that we will make use of:
q
name – is used to identify the control in
ASP.NET code.
q
type – specifies
which type of form control you are using. Valid options
are Submit, Reset, Radio, Checkbox, Hidden, Text, Password, and Button (there
are also image and file options, which fall outside of the scope of this book).
q
value – not strictly
necessary
for all controls, but can be used to specify a default value for some button or
text controls.
q
checked – if you wish to pre-select a radio control, so
that a particular choice is selected when the user first sees the page, you can
add the CHECKED attribute to a particular <input> tag.
These attributes of the <form> tag are all you need to be able to access and manipulate form
controls with ASP.NET code.

Buy Beginning ASP.NET with C# here
© Copyright 2002 Wrox Press
This chapter is written by David Sussman, et al
and taken from "Beginning ASP.NET with C#" published by Wrox Press Limited in June 2002; ISBN 1861007345; copyright © Wrox Press Limited 2002; all rights reserved.
No part of these chapters may be reproduced, stored in a retrieval system or transmitted in any form or by any means -- electronic, electrostatic, mechanical, photocopying, recording or otherwise -- without the prior written permission of the publisher, except in the case of brief quotations embodied in critical articles or reviews.
|
| 


